My Photo Mechanic Workflow

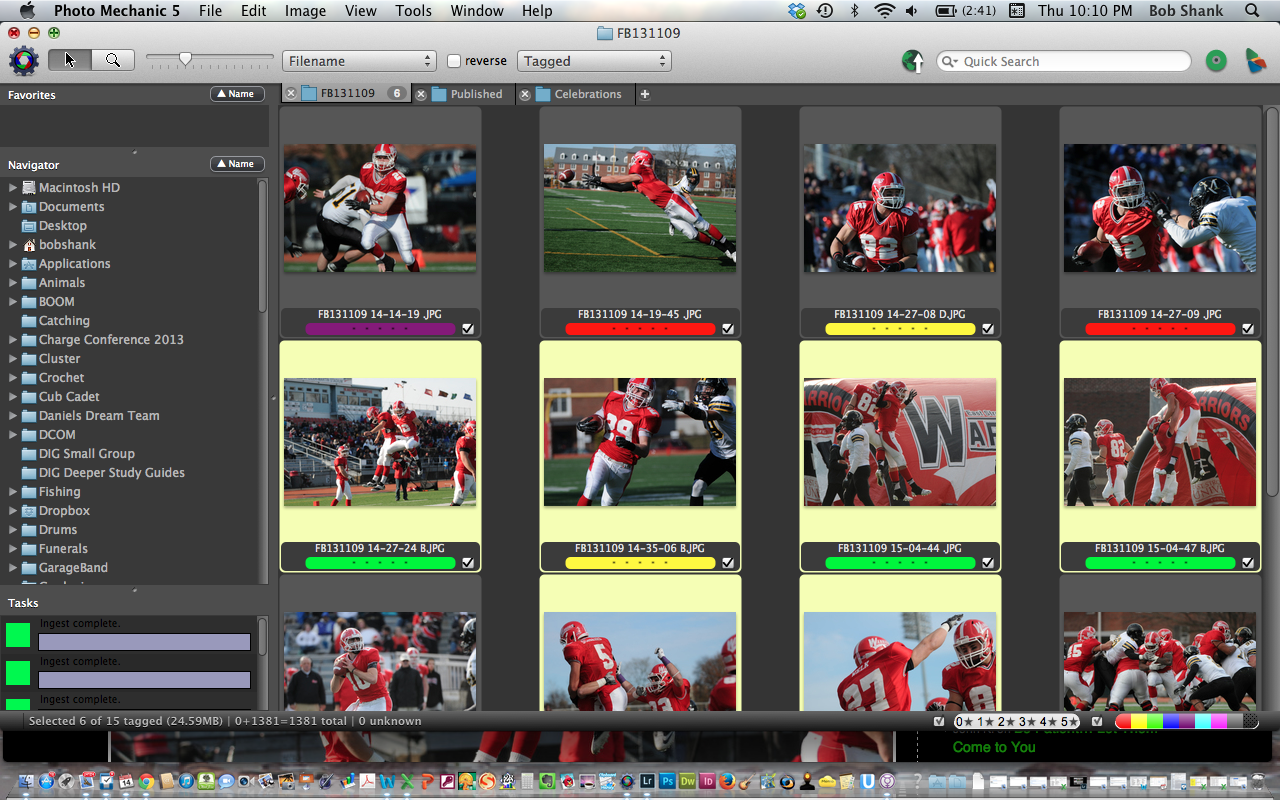
Screen Shot 2013-11-14 at 10.10.06 PMOver the past three blog posts, I shared why I use Photo Mechanic. So I thought it might be helpful to share how I actually use Photo Mechanic in my workflow.

First, I take the time well before each shoot to do some prep work. I create the rosters for each team in TextEdit. Any text editor will work. The creation of this roster file is easy. I give it a header say: //Pleasant Valley Football Roster 2013  Then I create the shortcuts starting with the team name. The format is the shortcut first, a tab, and then the full name. So it looks like this:
pv     Pleasant Valley
p1     Player Name1
p2     Player Name2 …etc.

I save this text file, open Photo Mechanic, go to the menu and select: Edit, Settings, and Set Code Replacements. This brings up a dialog box and all I have to to do is add the new shortcut file I made in TextEdit. I do this for both teams and have my shortcuts ready to go!

The second prep item is to setup the ingest and IPTC information including folder name and filename. I actually use a short folder and filename such as FB131115, which stands for Football and the date of the game with the year, month, and day. Then I add a custom suffix that includes the time each photo was captured. It looks like this: {iptchour24}-{iptcminute}-{iptcsecond} The reason I do this is because I use two cameras during a game. One is on a monopod attached to my 200-400mm lens and the other is over my shoulder with an R-Strap attached to my 70-200mm lens. When I ingest the photos into Photo Mechanic, they are sorted by filename and placed in the exact order I captured them according to the timestamp.

After the shoot, I place my two flash cards in card readers and have Photo Mechanic ingest them simultaneously. This is another nice feature of Photo Mechanic! Even as the photos are ingesting, I can start looking through the photos to find the best ones to send to my editor. To do this, I use the color coding feature. Unfortunately, Adobe Lightroom does not recognize the selected checkmarks from Photo Mechanic, but it does recognize the color codes! You can choose any colors you want. I use Green for my selects, Blue for photos to send to the editor, and purple for photos that will be sent for a photo gallery. I first go through all the photos in the preview mode and press 3 for the select photos, marking them green. I have the preferences set up so that when I do press 3, the preview mode automatically advances to the next photo. Otherwise, I just press the right arrow. I advance through the entire shoot in this way.

Then, I select only the selects by pressing Option(Alt) and clicking on the green color tab in the lower right corner of the screen of the Contact Sheet in Photo Mechanic. This displays only the photos I marked with the green label. Now, I go through them again, pressing 4 for the very best ones I want to send to my editor for possible publication. This marks them with a blue color. Then I go through each one of these to create captions for each one. This is where Photo Mechanic really shines!

Writing the caption is easy. I first click on the Info button in the Contact Sheet to bring up the photo’s IPTC info dialog box. Then, in the caption box, I start writing my caption. Let’s say that Pleasant Valley’s running back, #28, whose name I may not even know, is the main subject of a photo running into daylight through a hole made by the offensive line. I simply press p28 and his name appears in the caption box! Voila! Isn’t that awesome! This is really handy and a time-saving process for me. There are times when I can’t quite see the player’s full number, so I may have to go back through the series of photos captured at this time to make sure I have the correct number. But this one feature makes Photo Mechanic my goto software for what I do on every sports shoot!

Once all the captions are written, I need to submit them to my editor either via DropBox or FTP. I select the photos to send and then right click and choose Save Selected Photos As. This allows me to save the photos in the size and resolution of my preference. Once they are saved, I send them to my editor and I am almost done.

I then go back to the select (green) photos and select the ones I want to submit for an online gallery at the newspaper by pressing 5 and marking them as purple. I give them a more general caption such as, Pocono Mountain West v. Pleasant Valley November 15, 2013. Then I save them and send them to my editor.

When I get home, I import all the photos into Lightroom. The color codes are maintained, so I flag all these photos and then create Collections for the selects and the photo gallery. I also create a Collection for any photos that were published.

This is my current workflow with Photo Mechanic and Lightroom. It works really well for me solo, though I will occasionally supplement using Mitrefinch tms solution for team management, when working with a team of photographers and/or covering a variety of shots and not wanting duplicates. Communication is always key there! It is fast and efficient, and allows me to quickly sift through all my photos and send the best ones to my editor for publication. Pretty sweet!


Why I Use Photo Mechanic (Part 3)

Screen Shot 2013-11-14 at 10.10.06 PMWorking as a freelance stringer for a newspaper requires me to quickly sort through all the photographs of an event, pick the photos to submit to the editors, and write captions for each one. This can all be done in Lightroom and other software packages, but not nearly as easily and quickly as in Photo Mechanic. Code Replacements in Photo Mechanic is the primary reason I use this software on every sports shoot.

Here is an example: I am working through the select photos to submit to my editor and the deadline is fast-approaching. I need to write captions quickly and accurately to meet my deadline. Code Replacements allow me to use a shortcut, which includes the number of the players jersey, to include the players full name. Other shortcuts are also available, such as the team name, location, and any other metadata I choose to include in the caption. So to specifically describe this example, I come across a photo I need to write a caption for and include the players’ names. I simply use Code Replacements by pressing \code#\. It’s that simple and it’s incredibly quick! My code simply includes an initial or two of the team, say “P” for Pleasant Valley, and then the player #. So with 4 simple keystrokes I have the player’s name accurately and efficiently placed into my caption. “\P#\. This is especially helpful for the visiting teams whose players I do not know. Using the jersey numbers to help create my captions is awesome!

I do have to upload the roster for each team prior to the game, but this is easily accomplished. I absolutely love Code Replacements. They make my job much more manageable. I can provide accurate and quick captions for the photos I submit to my editors. What’s not to like?


Why I Use Photo Mechanic (Part 2)

Screen Shot 2013-11-14 at 10.10.06 PMYesterday I started a series of blog posts about why I use Photo Mechanic. I received several comments regarding this software; some were favorable and some were not. I understand that some people have a hard time changing or adding new software to their workflow. Others will not want to pay the money to add software to their repertoire. I am not trying to persuade you to follow my preferences; I am just sharing why I like Photo Mechanic so much.

The second reason I use Photo Mechanic is the speed in moving from viewing one photo to the next. This is where the Photo Mechanic’s speed really shows up. The ingest (or import) speed is faster than Lightroom but not incredibly faster in comparison. I do think every second counts, especially when I am up against a deadline. But side by side, moving through large files of photos to view them one after the other is really where Photo Mechanic outshines Lightroom by leaps and bounds!

Do a test for yourself. Open Lightroom and then open a photo in the Loupe view so the image fills the screen. Now scroll to the next few images one at a time. You will probably see the photo fill the image right away but you might see a little black box in the bottom, middle of the screen that reads, “Loading…” until the photo fully loads. This is the case especially when you are viewing RAW files. It just takes a while for the full-sized photos to fully load in Lightroom. Now do a test in the trial version of Photo Mechanic. Do you see a difference?

Tomorrow I will share my most favorite reason why I use Photo Mechanic. It is so helpful that I could never imagine not using this software to shoot another sporting event!


Why I Use Photo Mechanic (Part 1)

Screen Shot 2013-11-14 at 10.10.06 PMI was introduced to Lightroom several years ago and I still use Lightroom today. It is my preference for databasing my photographs and doing much of my photo editing and uploading galleries to my website. But something changed recently that introduced new software to my workflow.

I started shooting sports for a local daily newspaper, The Pocono Record. This new endeavor forced me to look at things differently in order to meet the stringent deadlines. One quick example: Friday night high school football games start at 7pm in my area and the deadline for photos to the newspaper is 9:15pm. The game is barely into the 3rd quarter in most cases by this time! Sorting through my photos and picking the ones to submit to the paper requires speed and efficiency.

I heard about Photo Mechanic and some of its speedy features, so I decided to check it out. I perused their website and decided to download a trial copy of the software for a month. After just one photo assignment, I was hooked!

The first reason I use Photo Mechanic is speed. This software doesn’t mess around. It allows me to quickly and efficiently sort through over a thousand images in short order. The speed of uploading my flash cards is much quicker than in Lightroom, and forwarding through image after image to preview them is much quicker, too! In reality, I read about this, but was hesitant to actually believe the hype. It wasn’t until I tried it myself that I realized the hype was right!

I will share my Photo Mechanic workflow in upcoming blog posts, but Part 1 of this series is clear: I use Photo Mechanic because of its speed. It is fast and it is efficient. Give it a try. Compare it to your preferred software and see if it makes any difference to you.


Being Efficient When You are Busy, Busy, Busy!

Just the other day I asked Siri, “Why am I so busy?” She quickly responded, “I don’t know. Frankly, I was wondering that myself!”

I am currently in the middle of a lot of photo shoots. Four days in a row with five photo shoots altogether! I’m not complaining; not in the least. I’m just busy, but good busy. During these stretches I sometimes find it hard to keep up with shooting, uploading the photos to my computer, editing them, creating galleries, charging batters, cleaning lenses, connecting with potential photo clients, and everything else. Busy, busy, busy!

Streamlining routine tasks is essential in busy times. I like to use the Energizer rechargeable NIMH batteries in the quick charger because they are charged in about 15 minutes or less! This saves a lot of time from the days when I had to charge batteries overnight. Now I can charge all 14 batteries while I am uploading photos from my compact flash cards to my Drobo.

Staying on top of these tasks is critical especially when photo shoots are so close together. Forget to empty a card and there will be no room for more photos during the next photo shoot that day. This is definitely not a time to be forgetful or fly by the seat of your pants! Good habits, predictable patterns, and a logical strategy all help to stay on top of everything in busy times.

Keywording is best done right away. Why wait to do it later when it might be forgotten? Some keywords can be entered automatically as we import them. Other more specific keywords have to be entered manually. Doing this right away makes it easier to remember the details of this shoot rather than relying on a spotty memory later on down the week or month. Stay on top of key wording and the rewards will be more than obvious down the road.

Editing photos is another key area in which to aim for efficiency. This, for me, includes locating the keepers, confirming or changing the proper white balance, and making any necessary minor edits to the photograph if needed or desired. The absolute best way to be efficient here is to get everything right in the camera. With some photo editors this is required, so it is a great goal to aim for from the beginning. It saves time, too.

What ways are you finding to be efficient in your photography?

Do It Now or Catch Up Later – Thoughts on Photo Workflow

Today as I was pondering what to blog about, I decided to go back over last year’s photographs. The thought in my mind was that since the high school baseball season starts very soon, I could do a preview utilizing an old photograph from last year. There was an immediate problem, however. I had not kept up with rating all my photos from the previous year!

I am fairly faithful with flagging photos in Lightroom because I can then easily create a collection of each photo shoot or at least go back easily and view the keepers from that shoot. But I also use ratings to keep track of the very best photos… some of the time. So here came today’s blog thought: Rate them now or you’ll have to catch up later.

This is true in so many areas of photo workflow. Keywords are a prime example. Do you enter keywords right after a shoot or do you delay this important step until some time later? What about metadata? Do you automatically have it entered on import or do you have to remember to do it later?

My ideal workflow looks something like this:

  1. Import all photos (metadata and some keywords are added automatically on import)
  2. Flag the keepers
  3. Add any additional specific keywords as needed (jersey #s for ball players, names, etc.)
  4. Color code any I plan on using for my blog, sharing on Google+, or any other use
  5. Edit any of the flagged photos as necessary
  6. Rate the best photos with 5 stars and the next of best with 4 stars
  7. Create a collection of this particular shoot for easy reference later
  8. Create a gallery of the keepers to share on my website

This is my ideal photo workflow that works well for me when I remember to do everything in this process.

What is your workflow? What works well for you? What do you struggle with?


It’s Easy to Create PayPal Galleries in Lightroom

Lightroom makes it very easy to create web galleries. It is pretty much as easy as selecting the photos you want to include, modifying the gallery to your liking in the Web module, and then exporting this information and uploading it on your server. It actually sounds more complicated than it is to do. In the previous two blog posts I talked about how to do this in detail and even protect web galleries with a password.

Today I want to share with you how easy it is to create a PayPal gallery in Lightroom. I use these PayPal galleries all the time because they allow visitors to my website the ability to easily order prints using PayPal or any credit card. This feature alone has contributed to an increase in prints sales, particularly from parents of baseball players. You hear of many online services that do this for you. They take care of designing the code behind the galleries and then  you just upload your photos to their service, of course in addition to paying their monthly fees. I wasn’t sure I would have enough sales to warrant this expense, so I decided to do it by myself. Lightroom made it possible in a huge way for me!

The key is a template called “LRG One with PayPal Shopping Cart.” The link to this awesome template can be found here. Basically all you do is download the template, read the instructions on how to install and use it, add a few bits of information in your metadata, customize the gallery, and upload it to your server. Again, this all sounds much more complicated than it actually is to implement.

I use this template for all of my sports photography shoots. I select the photos to include in the web gallery. Then I include the metadata information for the size prints I offer, which is easy to do using the Sync feature. This copies the metadata to each photo that is included in the gallery. Then I export using the LRG One with PayPal Shopping Cart template. I even add the password protection I mentioned in yesterday’s blog entry.

Now when someone visits my web gallery they can view the photos and purchase prints of varying sizes using PayPal or their preferred credit card. Of course, you have to set up a PayPal account and they take a small percentage of each sale, but it is much less expensive than using one of the other online services.

Once I receive an order from PayPal via email, I simply prepare the order and send it off to my photo lab. They print the prints and send them off to my client. It is that simple and I love it! The PayPal template is definitely one I find invaluable and highly helpful!

Secure Web Galleries

I do a lot of sports photography but most of it is with young players whose parents may not be thrilled with faces of their children all over the internet. So, by using Lightroom to create a web gallery and then working in Dreamweaver, I can create password protected galleries that attempt to keep the photos more secure. For me it has worked beautifully and the parents of the players I work with seem to appreciate this extra effort.

Here is what I do.

I create a web gallery in Lightroom, which I described in yesterday’s blog entry. Then I open up the newly created index file of this gallery in Dreamweaver. I edit the file by adding some code that directs the web page viewer to a login screen. You can see an example of this login screen by going here. This additional code is not complicated and once I created it the first time I can just copy and paste the code into a new gallery without having to retype it.

The logon code is contained in a different file in the same folder or directory. This requires the webpage viewer to enter a username and password that I assign for the gallery. This information is passed on to the players, coaches, and parents. They are encouraged to share this info with their friends and family, but it prevents anyone who stumbles across my site from gaining access to the photos of minors. It works well and is not difficult to set up.

I then create a link on my website that allows the team to view the photos after they enter the username and password.

If you are interested in the details and code of how this is done feel free to email me. I am more than happy to share with others what works for me. After all, I learn something new every day about photography. It is a great time to be a photographer!

My Photography Workflow

After writing yesterday’s blog entry, it occurred to me that it might be worthwhile to explain my photography workflow in more detail. We all have our patterns, habits, and preferences. There is no right or wrong way to take our photos from our cameras to the end product, but some methods are easier than others. I do not believe my process is the only way or even the best way; it is just what I currently use after many years of experimentation and some trail and error.

I prefer using Adobe Lightroom for my photo management and editing software. Here is the workflow that I am currently using on every photo shoot.

First, I use a card reader to copy the photos into my laptop when on photo trips or my desktop when I am home. I copy the photos into the DNG format on import. Yes, this takes time, but the file sizes of DNG are smaller and you either have to convert now or do it later. On import I also rename each photo according to this format: date-sequence. So, for example, if I have a photo shoot today, I will create the import format to be 20100821-1, with the last number moving up sequentially for each photo. I will also add any general keywords that apply to all these photos. I have a Drobo so I import the photos directly to that physical drive and place all the photos in a folder named “Photographs.” I will assign a new folder name for the import by using the name of the photo shoot followed by the date. I like using the name of the photo shoot first, which is a change for me. I used to use just the date of the shoot, but that was not descriptive to me, so now I assign a name for each photo shoot to the folder name first. I also set up and use a saved metadata preset to assign copyright information, etc.

Once the photos are sitting in Lightroom, I then go through the photos to find the keepers. My process works like this. I enlarge the photo in the Library Module so I am only seeing one photo at a time. I use the right arrow to move to the next photo. When I come across a photo that I want to mark as a keeper, I press the “P” key to “pick” that photo. I have Lightroom set up to then advance automatically if I do press the “P” key. This feature of advancing to the next photo automatically when the photo is picked helps to move the process forward quickly. To set up the auto advance feature, click on “Photo” on the top menu and click on “Auto Advance.” I can quickly go through my whole shoot just picking the photos I want to mark as my keepers.

Once I go through all my photos I then create a collection just of these keepers. I may want to create a web gallery or slideshow of these photos, so I make the collection now. Then I go through the photos in this newly created collection. I am now looking for what I call the “Best of the Best” photos. These are the ones that make the final cut and ones I will show to clients, colleagues, or friends. These select photos need to be representative of my very best work so I am brutally hard with this part of the process. I will go through each photo again, carefully examining the composition, colors, exposure, lines, and other details. When I come to a photo that makes this final cut I then assign it a star rating. Usually these select photos get either 4 or 5 stars depending how on the strength of the photograph.

Now I will use these “Best of the Best” to post on my blog, use as initial proofs with a client, post to my website, or share in any number of ways. I often post all the photos in the collection if I have done a sports event because everyone likes to see their player in action. But if I am sharing photos in other ways I try to stick with just showing the “Best of the Best” photos from each shoot. Creating the web galleries, even with PayPal features, or creating slideshows are all very easy from within the newly created collection.

Sometimes I use color labels for specific reasons. I use a red label if I know a photo needs editing. The red label reminds me that I still have work to do on this photograph. I also sometimes use green labels to mark photos that I want to use for a photo book. And I use blue labels for photos that I want to use in a web gallery. I recently found a great feature in Lightroom that helps me use these color labels but without seeing the whole frame around the photo in that color. Having a photo surrounded in color can make that photo look different than when it is against a neutral background. So here is what I learned to do. Go to Grid View Options and deselect the “Tint grid cells with label colors” in the Options panel. Now go to the bottom of this same screen and select “Include Color Label.” This results in a small color swatch appearing beside the start ratings at the bottom of each photo in the Grid View instead of having that color surrounding the whole photo. Pretty cool, huh?

If this specific photo shoot was away from home, I will then import the Lightroom Catalog to my desktop computer so I retain all the picks, edits, and other changes I made in the field.

So this is the workflow I am currently using. What do you think? Does it make sense? Is there anything I am missing? How can this process be enhance and improved? What do you do in your workflow process? Please share your thoughts because we always learn more together than we ever learn alone!

These Photos Didn’t Quite Make the Cut

I enjoy the editing process of photography. After an event or outdoor photo shoot, I come back to my studio to edit the photos and see just what I captured. The first part of the process for me is picking the best photos. I use Lightroom 3.0 now and have learned how to quickly go through a large number of photographs and select the best ones. I mark them as picked by pressing the “P” key. Then I go back over these selected photos again to really narrow down the very best of the best. I mark these with a green label and then give them a star rating depending on the strength of each individual photo.

Last week I came home and had 72 photos that I picked and then narrowed this down to 11 of what I considered to be the best of the best of this photo shoot. These are the ones I show on my website, to colleagues, and to friends. Most of my friends don’t have the patience or willingness to sit through a slide show of all the photos I took or even the ones I think are the best. Showing our best work is an important part of the editing process.

I make sure to take the time to edit my picked photos and spend a little extra editing time with the best of the best, which are going to be seen by others. I am quite picky in this process but then I expect big things of my photography. Sadly, this means there are many photos that almost make this selection process but are just out of reach to making the best of the best category.

Here are three examples. The first one was very close to being selected, but I just didn’t feel the colors were quite right and I wished I had more of this eating bull in the image. It’s close, but didn’t make my final cut. The second one was also close to making it. I really liked how we can see the bull’s tongue coming out of his mouth in this photo, but again the colors were kind of flat. (The light wasn’t very good that evening.) It was just shy of impressing me enough to be picked as the best of the best. The third image has some weeds in-between the camera and the bull. This was distracting enough to be the worst of these three and not good enough to make the final cut. I certainly won’t trash these photos, but they just didn’t quite make the final cut.