BE a Better Photographer

IUPGraduationPhotos2018 01102

Inspired by Fred Stluka, I created a new segment on my website this week. BE a better Photographer is a quick list of tips on various subjects on how to be a better photographer. Some of the tips are straightforward while others make you think a little. Each category is accompanied by a photograph relating to that specific topic.

Check it out here: http://bobshankphotography.com/BEabetterPhotographer.html

Fred Stluka is my Software Super Hero! We had lunch this past week and he is always so engaging and inspirational. I learn not only how to code better HTML, but how to be a better and more positive worker, how to have The Fred Factor, and how to network with others. I included one of Fred’s website links in my new segment, but I want to include it here as well: http://bristle.com/Tips/Career.htm Please check it out, it’s very informative!


Pleasant Valley Graduation

PVGRAD 2014-06-13 0805

Pleasant Valley held their 2014 Graduation on Friday night. The weather was threatening and produced some heavy rain, so the Commencement was held indoors in the high school gym which they decorated with table and chair covers so everything was perfect on this event. Parents, grandparents, and friends gathered to watch the special event as the seniors graduated.

I was there on assignment as a stringer for the Pocono Record. It was special for me because I know a lot of these students. After all, I photographed many of them in their sporting events over the past years!

You can view more photos of PV’s Graduation here.

New Blog Layout

Screen Shot 2013-10-04 at 2.55.57 PM

I started my photo blog back on September 28, 2009. I enjoy sharing photographs, photo tips, software suggestions, and more on my photo blog. It is a fun endeavor. Sometimes I blog almost every day of the month, while other times, like when I am traveling or busy, I only blog a few times during the month.

I use WordPress as the software medium for my blog. As for videos, my editing needs haven’t gone more than what the software at  https://www.makewebvideo.com/en/make/3d-text-intro-video offers. It was very easy to set up and I do enjoy its interface. Over the past year I was reading of the advantages of moving from WordPress.com to WordPress.org. The difference would include a few upgrades on my hosting site and require me to host the WordPress software on my side of things instead of just over the internet. I also had to move all the past blog entries, which I knew was going to require some time.

Well, I think I’m there! I moved all the blog entries after setting up my website host properly. This is my first blog post in WordPress.org for me. I am very happy with the progress so far and especially the customization available with this new format. I still have some tweaking and adjusting to do, but I think I’m going to go live with this today.

Technically speaking, there is only a subtle change for you, the visitor to my blog. The url used to be bobshankphotography.wordpress.com Now, the new url is:
http://bobshankphotography.com/blog/

I will put a link on the old site so visitors can easily get to my new blog, but please change your bookmark to my site when you get a chance. Spread the word, too, about my photography blog. As I was looking back over the past five years of entries, I was surprised to see all the many and different topics I blogged about so far. The future looks bright for me, too! I keep learning more and more about how to capture better photographs. I am getting published in our local newspaper with my sports photographs, and my wildlife photography is getting better, too!

Stay tuned for some exciting blog postings, which will be forthcoming. I have some ideas on sharing some of what I do both behind the camera and in post-processing. I will re-visit my photo workflow to show you how I quickly sift through all the photos of a shoot to focus on the best photos for editing, captioning, publishing, and sharing with others. I will also talk about software I find helpful, my take on what editors are looking for in a photograph, and how I am improving in my sports and wildlife photography.

So, I hope you like this new blog format. To be honest, I was getting a little sick of the orange text in my old blog. I hope you like this new format, but more importantly I hope you keep visiting and checking in to see what I am blogging about each week. I truly hope there is something helpful for you here. If so, share my blog with your friends and colleagues. My photography passions are growing each day and I always enjoy sharing this deep passion with others!

These Old Photos Bring Back Some Strong Memories!

I went to college at Temple University and graduated with a degree in Journalism. This education has helped me literally every week of my professional life. I went off to graduate school the same year I graduated from Temple.  One night, while I was in my dorm room in Pittsburgh and thinking about the required papers and class load of school, I heard some sirens. It wasn’t the usual, city siren passing by from an ambulance or single fire truck. No, this was a full-blown 5-alarm fire and I could see the flames from my dorm room window! So, I grabbed my camera and ran the seven city blocks to photograph the fire and firefighters who were working feverishly to put it out.

Pittsburgh Fire 1987-002 Matte

My mind raced back in time to my first photography class at Temple University. Our professor instructed us to always have our camera with us. On this night, I was very happy to have my camera with me. I started taking a few shots as I got closer to the fire. It was a cold December night and it was dark.

Pittsburgh Fire 1987-003 Matte

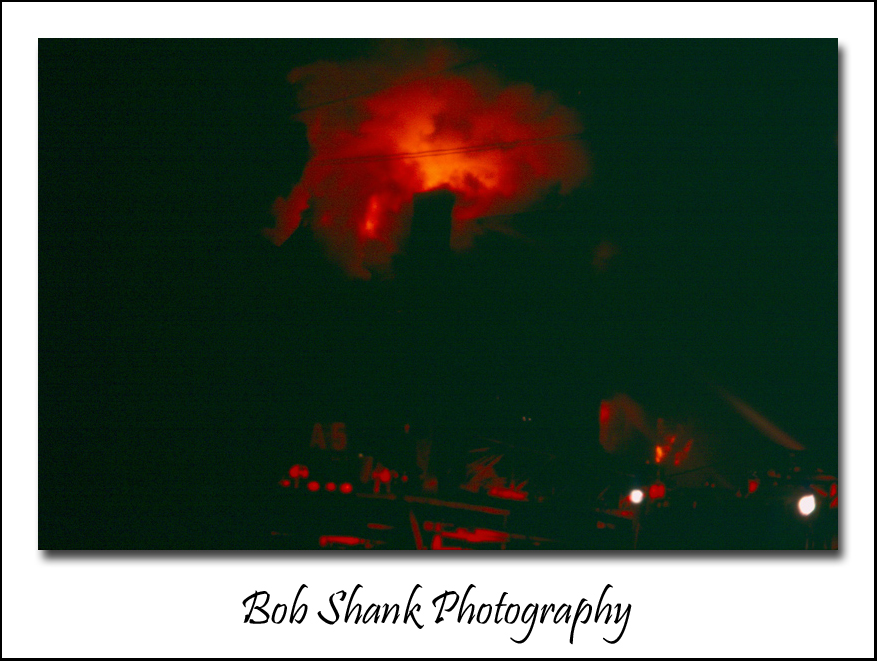
The flames were already completely out of hand and engulfing the row house. Firefighters were laying down hoses and keeping steady streams of gallons of water flowing onto the structure. Fortunately, no one was inside the home that night. I kept taking photographs as I changed angles every now and then to get different perspectives.

Pittsburgh Fire 1987-004 Matte

I did not mind the cold air one bit. Besides, the flames from this fire were heating up the whole block! So I persistently and patiently photographed the flames behind the firetrucks, which were parked in the middle of the street. I never saw such a large fire in my lifetime. This was big!

Pittsburgh Fire 1987-005 Matte

Not every shot worked and since this was back in the slide-film days, I wasn’t sure I actually was getting anything usable. My training and education from Temple, however, prepared me better than I could have imagined. The thrill of being the only photographer on location was exhilarating for me. Then, my eyes noticed something special. I saw a firefighter on top of a fire truck aiming a water cannon toward the fire. This alone was nothing unusual, but he was situated just beyond a beautifully backlit  instrument panel. Here is the photograph I captured:

Pittsburgh Fire 1987-007 Matte

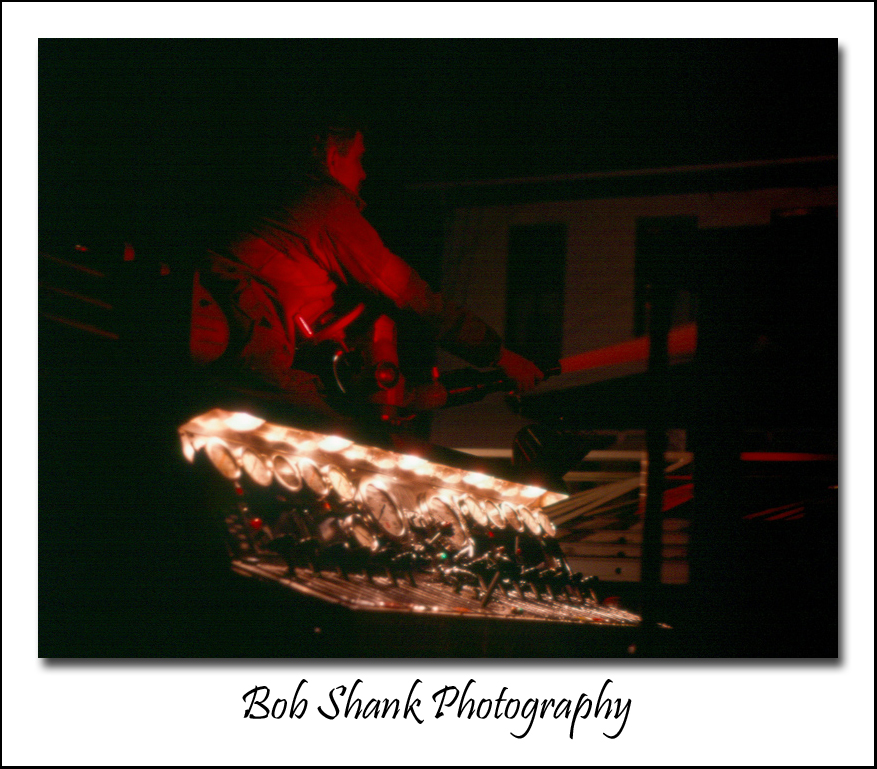
I think it works pretty well to show the tireless work of these firefighters and the equipment they use to fight the fires. I did not realize the power of this image until I had the film developed and opened the box of slides. As I looked carefully at each slide, this one just popped out at me. It was my favorite one of the entire shoot.

The next day I went back to photograph the charred remains of the row house, as you can see here in this photograph.

Pittsburgh Fire 1987-009 Matte

The damage was devastating but at least no lives were lost. I would suggest the owner of this house check out Singleton Law Firm website to find a good for Fire Damage Attorney as the damage is impressive. I got to bed much later that cold, December night and it was well worth it! I captured the consuming flames, the lights of the firetrucks, the efforts of the firefighters, and even the aftermath of this incredible fire.

I actually pretty much forgot this event until earlier this week when I dusted off my Photojournalism textbook for another photo project I am working on now. The textbook is entitled, “Photojournalism: The Professionals’ Approach,” by Kenneth Kobre. I started re-reading this textbook and came across an early chapter in the book about how to photograph fires. Incredibly, it was like these words were in my head and my actions that night. It was textbook! (Please pardon the pun.) Today, as I was scanning these slide images into my computer, I relived that night again after reading that specific chapter in my old textbook. I somehow took the words to heart and did just about everything mentioned in this section of the book.

That was the good news. Unfortunately, there was some rather sad news, as well. I did not even try to market my photos to the local newspaper that day. I suppose I was too busy with my classes in graduate school, but it certainly was an opportunity missed!

Lessons learned include:
1. Always have my camera with me
2. Learn to use existing light
3. Rely on my education; it was very good
4. Do not undervalue my photos or keep them to myself
5. Keep learning the craft & keep shooting!
6. Be a photojournalist!

I am a freelance photographer who is like wine–I am getting better with age! I now have many years of sports and wildlife photography under my belt, which I continue to enjoy. I also am branching out in new ways to some of the approaches I learned while attending Temple University. I am blessed. I see an event and I desperately desire to communicate that event in a visual way! I cannot wait for the next event to unfold!

Pcuts

Charlie Brown 2013-03-15-091 Matte

A “Director’s Cut” of a movie is the Director’s own preferred edit. “Dances With Wolves,” one of my all-time favorite movies, has a Director’s Cut. So this got me to thinking–since I am a still photographer why not create my own version of the “Director’s Cut” from my photo galleries?

Charlie Brown 2013-03-15-311 Matte

My creative thinking was based on two reasons. First, on any photo shoot, I have my personal favorite shots that I prefer for one reason or another. It might be the lighting, the composition, the expression on a face, or any other reason why I just like some of my photographs. Second, I create very large photo galleries after a photo shoot. For example, at the recent Pleasant Valley High School musical, “You’re a Good Man, Charlie Brown!” I produced over 9,000 photos! Even once the photos are edited and the bad ones removed, this results in some extremely large galleries. So my second reason was to offer more manageable photo galleries for visitors on my website to view.

Charlie Brown 2013-03-15-1657 Matte

I am calling these preferred photographs from a photo shoot “Pcuts.” They represent this photographer’s personal favorites for one reason or another.

Charlie Brown 2013-03-15-145 Matte

I just posted my newest Pcuts of the first performance of “You’re a Good Man, Charlie Brown!” on my website. If you care to view these Pcuts (my personal favorites), you can view them here. The photographs you see here are just a few of the Pcuts from Friday’s performance.

Charlie Brown 2013-03-15-1688 Matte

Charlie Brown 2013-03-15-1874 Matte


Photo of the Month Posted

I posted the most recent Photo of the Month on my Perfect Game Photos website.

This monthly feature shows a sports photograph that I like with a story behind it. I simply show a photo and then add some text to help tell the story why this particular photograph made the cut. It is a feature I enjoy including on my sports site and I find it encourages me to keep trying for better photographs month after month.

You can see more of my sports portfolio here.


Being Efficient When You are Busy, Busy, Busy!

Just the other day I asked Siri, “Why am I so busy?” She quickly responded, “I don’t know. Frankly, I was wondering that myself!”

I am currently in the middle of a lot of photo shoots. Four days in a row with five photo shoots altogether! I’m not complaining; not in the least. I’m just busy, but good busy. During these stretches I sometimes find it hard to keep up with shooting, uploading the photos to my computer, editing them, creating galleries, charging batters, cleaning lenses, connecting with potential photo clients, and everything else. Busy, busy, busy!

Streamlining routine tasks is essential in busy times. I like to use the Energizer rechargeable NIMH batteries in the quick charger because they are charged in about 15 minutes or less! This saves a lot of time from the days when I had to charge batteries overnight. Now I can charge all 14 batteries while I am uploading photos from my compact flash cards to my Drobo.

Staying on top of these tasks is critical especially when photo shoots are so close together. Forget to empty a card and there will be no room for more photos during the next photo shoot that day. This is definitely not a time to be forgetful or fly by the seat of your pants! Good habits, predictable patterns, and a logical strategy all help to stay on top of everything in busy times.

Keywording is best done right away. Why wait to do it later when it might be forgotten? Some keywords can be entered automatically as we import them. Other more specific keywords have to be entered manually. Doing this right away makes it easier to remember the details of this shoot rather than relying on a spotty memory later on down the week or month. Stay on top of key wording and the rewards will be more than obvious down the road.

Editing photos is another key area in which to aim for efficiency. This, for me, includes locating the keepers, confirming or changing the proper white balance, and making any necessary minor edits to the photograph if needed or desired. The absolute best way to be efficient here is to get everything right in the camera. With some photo editors this is required, so it is a great goal to aim for from the beginning. It saves time, too.

What ways are you finding to be efficient in your photography?

Photo Tip Tuesday – Camera Repairs


Last week my Nikon D300 camera body went down. The shutter release would flip the mirror out of the way but it wouldn’t always drop back into its proper position. To say it was frustrating is the understatement of the day! I tried shooing one baseball game but it was a disaster and I spent more time trying to figure out what was going on than shooting the game. Total bummer!

I took the camera body to my local camera shop and they said it would have to be sent into Nikon, which would take 4-6 weeks minimum. Since this is pretty much an every-day camera, I did not like this option. Fortunately, my brother who is in the photography business, too, recommended a camera repair shop. He said he had good experiences with them and their turnaround on repairs was quick. This seemed to be just what I was looking for!

I quick email to Perfect Image and they sent back a repair quote almost immediately. Nice. I took the camera to Perfect Image last Friday, which for me was a two-hour drive. Perfect Image is in Lancaster and they do ship, but I wanted my camera back quickly and didn’t want to wait for shipping. Wes, at Perfect Image, told me knew exactly what the problem was with my camera body and that he would get the repair done within the week. Nice again!

Well, in the early afternoon on Monday my cell phone rang. I saw the 717 area code and thought, “No way.” But sure enough, it was Wes and he said my repair was completed. I paused and then said, “Wait! Is today April 1st?” thinking this might be an April Fool’s joke! Wes assured me that no, it was April 2nd and that the repair was indeed completed. Unbelievable!

I drove down today to pick up my camera body and then visited my mom who lives nearby.

If you ever need any camera or lens repairs, do yourself a favor and consider Perfect Image. They are fast and very friendly. I highly recommend them and will be taking all my repair work to them in the future. And tell them you heard about them from my blog. I won’t get any kickbacks, but it is nice to know where their referrals are coming from. Check out their website and get free repair estimates at: http://www.perfectimagerepair.com/

Think about it: 4-6 weeks minimum verses a little over 24 business hours. There’s no comparison in my opinion!  And that’s today’s photo tip.

Do It Now or Catch Up Later – Thoughts on Photo Workflow

Today as I was pondering what to blog about, I decided to go back over last year’s photographs. The thought in my mind was that since the high school baseball season starts very soon, I could do a preview utilizing an old photograph from last year. There was an immediate problem, however. I had not kept up with rating all my photos from the previous year!

I am fairly faithful with flagging photos in Lightroom because I can then easily create a collection of each photo shoot or at least go back easily and view the keepers from that shoot. But I also use ratings to keep track of the very best photos… some of the time. So here came today’s blog thought: Rate them now or you’ll have to catch up later.

This is true in so many areas of photo workflow. Keywords are a prime example. Do you enter keywords right after a shoot or do you delay this important step until some time later? What about metadata? Do you automatically have it entered on import or do you have to remember to do it later?

My ideal workflow looks something like this:

  1. Import all photos (metadata and some keywords are added automatically on import)
  2. Flag the keepers
  3. Add any additional specific keywords as needed (jersey #s for ball players, names, etc.)
  4. Color code any I plan on using for my blog, sharing on Google+, or any other use
  5. Edit any of the flagged photos as necessary
  6. Rate the best photos with 5 stars and the next of best with 4 stars
  7. Create a collection of this particular shoot for easy reference later
  8. Create a gallery of the keepers to share on my website

This is my ideal photo workflow that works well for me when I remember to do everything in this process.

What is your workflow? What works well for you? What do you struggle with?


Do You Print Any of Your Own Photographs?

Printing photographs has come a long way in just a short time. Years ago no one individual thought much about printing his or her own photographs. The lab technicians were the experts and so we dropped off or delivered film to them and waited for the prints to come back. Sometimes it seemed to take forever!

Enter the computer age and all this changed. Now individuals have the equipment to successfully print quality photos that rival and even exceed what the technicians did a few short years ago. The digital age is here and it offers some absolutely amazing possibilities for our photography!

I will admit, I was not too eager to jump onto the printing-your-own band wagon. Oh I did get a printer to give it a whirl, but the results were pathetic and downright awful. The colors were all off and the ink was blotchy. I could never give one of these prints to anyone nor would I ever want to hang one on a wall for anyone to see. So I let the photo lab do all my prints.

Recently, a good photo friend, Bill Weitzmann, was talking to me about how easy he found printing quality photographs to be for him. I listened carefully and tried to ignore the voice inside my head that was saying “been there done that unsuccessfully before.” Bill’s enthusiasm quickly touched and took hold of me. He made it sound easy and since we both use Macs, monitor calibration software is already built into our OS.

Leaving that exciting conversation, I decided to give printing another try. And boy am I ever glad I did!

I am not quite where I want things to be just yet, but the quality I am getting three days after my first attempt is nothing short of amazing. Bill provided detailed instructions for me to calibrate my laptop monitor and then have the printer read the color management from the laptop. The first print using his method got me so excited I could hardly contain myself!

My prints are still too dark but they are getting closer and closer to the quality I am after with printing on my own. I can see that at least some of my favorite prints will soon be hanging proudly on the walls of my home and our camp up in the mountains. The colors and the quality are mind-blowing to me. I never imagined this could be possible at this level.

I may share more details in-depth on a future blog post but for now I will just share a few things to keep in mind if you want to attempt this for yourself. And I highly recommend that you do! I was going to wait to get a more modern and better quality printer, but my Epson R320 is kicking out some fantastic results!

Printing Tips

1 – Calibrate your monitor
You want to be able to print what you see on your monitor and match that as closely as possible. Calibration is critical to get the best quality possible. This is even important to do when sending photos off to be printed at a lab, too. Otherwise you might be disappointed with what you get back.

2 – Use a color tablet
Kodak had an old book that included a color tablet, which is the spectrum of colors in the rainbow and various shades of gray. By matching this and tweaking the appearance in Photoshop you can get your printer to “talk” to your monitor and repeat the colors, so that what  you see on your monitor is what you’ll get when you print from your printer.

3 – Update Printer Drivers
I found out the hard way that this is a very important step. I suggest you actually do this first because it can save you precious time down the road later. My trouble was twofold: I upgraded the Operating System on my laptop and I was using an older style Epson printer, the R320. I was not even able to get the landscape printing feature to operate at all until I updated my printer drivers. I wish I had updated them right away before I got started as this would have saved many sheets of photo paper and much frustration!

4 – Consider Using Lightroom
Printing is definitely easy to do out of Photoshop or any other photo editor, but Lightroom allows for a broad variety of printing options. For example, in Lightroom I can print contact sheets, wallets, assorted layouts, backdrops, and much more; and it’s very easy! I love Lightroom to begin with as I use it to manage my photo database and edit all my select photos. I also use Lightroom to upload galleries of photos to my website. But now I know I am going to enjoy the Print Module, too. There are just so many neat options and features in Lightroom!

5 – Be Patient
This process of setting up your printer, calibrating your monitor, and getting it to all work together can be and probably will be frustrating at times. Only start this project when you have a decent amount of spare time. Be willing to make a few mistakes and keep trying to perfect the process. Patience will definitely pay off. I know this because I experienced it firsthand this week!