Before & After

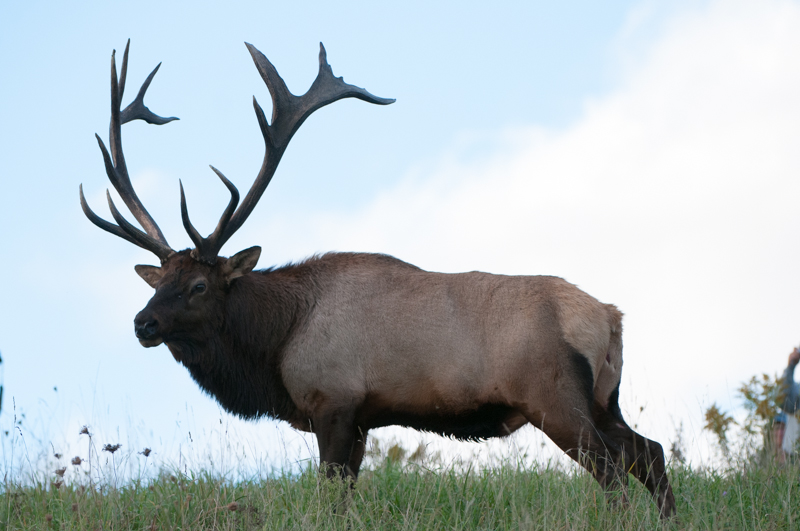
PEPE#7-3496a

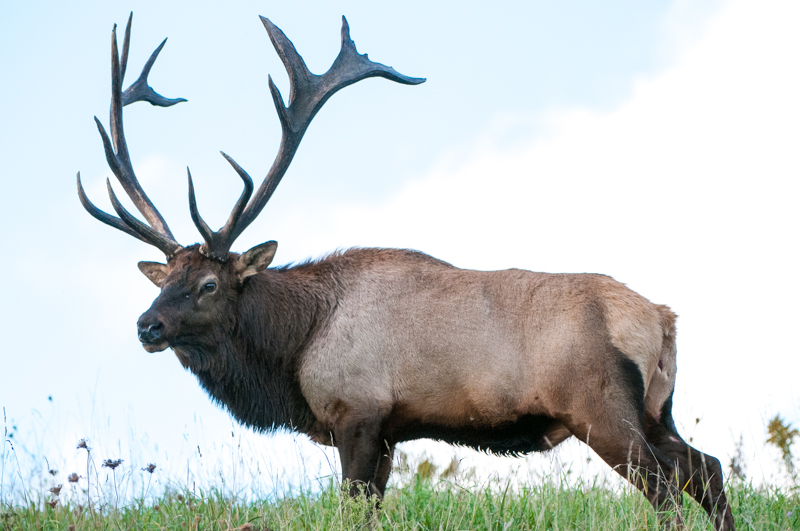
PEPE#7-3496b


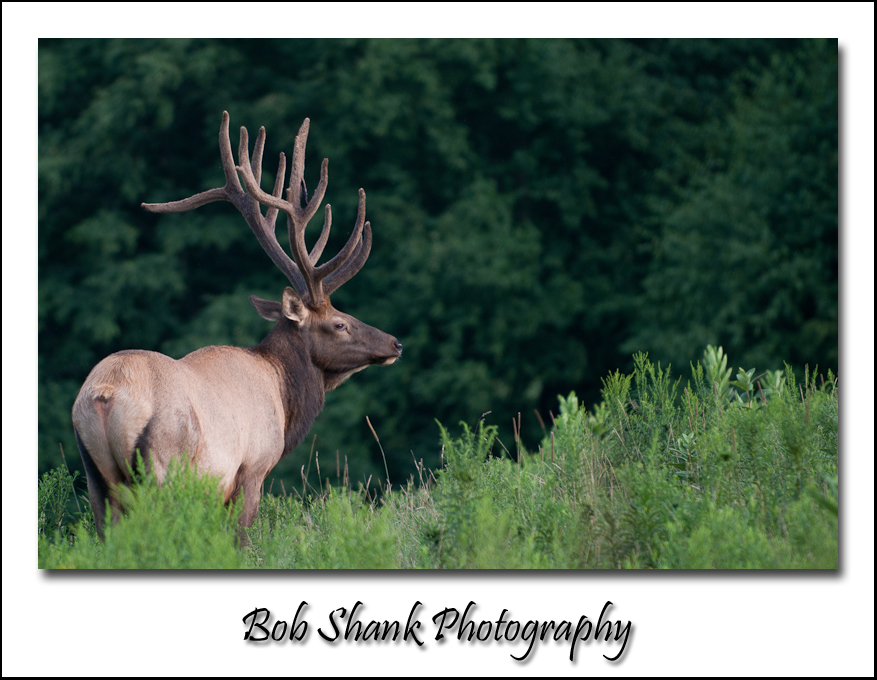
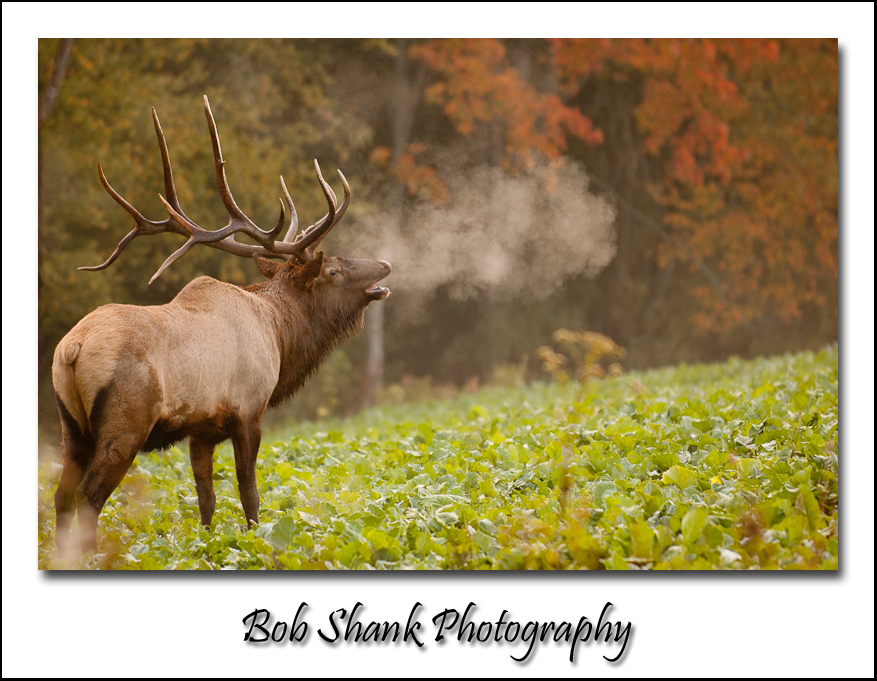
Lightroom is my go-to choice for both keeping track of and editing my photographs. I do use Photo Mechanic and Aurora HDR software, as well, but those are topics for another blog post. I also have and use Photoshop, but easily 95%+ of my photo edits are accomplished in Lightroom. So I thought for today’s blog post, I would share this before and after photograph to just share a few edits I do routinely in Lightroom.

First, I have to thank Dick McCreight, my colleague and professional photographer who is an absolute guru with Lightroom’s Develop module. He makes it look so easy and is somehow uniquely able to teach what he knows. He is awesome! Thanks, Dick! Also, John Kliest, another colleague and photographer, recently helped me to better understand Lightroom’s Develop module. One tip in particular comes to mind that I learned from John, which involves the Highlights slider. I know my way around Lightroom’s Library module well. I can edit a new shoot in no time, flagging the best photos and using color labels to identify photos I want to use for my blog or some other purpose. The Develop module, however, was a place I somewhat feared to tread. It just seemed kinda overwhelming to me to be honest. Well, Dick and John relieved my fears and taught me some really valuable and helpful stuff so I can now edit my photos efficiently. Thanks guys!

Let’s start by looking at the first photo above. You can see the exposure is a little dark and there is a floating arm from a person located in the lower-right corner of the photo. The cropping tool was used first and I just slightly cropped out that floating arm. LIghtroom makes this quick and easy.

Then I adjusted the exposure, bringing up the light a little shy of half a stop. This was a good start to editing the photo but I knew I couldn’t stop here.

So, I then adjusted the highlights, white clipping, and black clipping sliders. The goal in wildlife photography is to always keep the focus on the subject. Working with the white and black portions of the photograph can sometimes provide drastic changes. Sure enough, once I made these adjustments, I had to scale back the exposure about 2-tenths of a stop. I guess I should have started with these adjustments before correcting the exposure.

Then I worked on adjusting the shadows and contrast. Typically, I find the shadows slider to be a very helpful tool in bringing details out of the dark, literally!

Finally, I added a little smidgen of clarity and vibrance, which I do to most of my photographs.

Within just a few short minutes I edited the photo to a very usable and better quality photograph by using the Develop module in Lightroom. I know I still have a lot to learn about properly editing photographs, but equipped with even the little knowledge I do posses, I can see big changes in my photographs after editing them.

Lightroom is a great tool on a number of levels. I will post more blog entries in the future to share in detail how I use this amazing software. Lightroom rocks!
Do It Now or Catch Up Later – Thoughts on Photo Workflow

Today as I was pondering what to blog about, I decided to go back over last year’s photographs. The thought in my mind was that since the high school baseball season starts very soon, I could do a preview utilizing an old photograph from last year. There was an immediate problem, however. I had not kept up with rating all my photos from the previous year!

I am fairly faithful with flagging photos in Lightroom because I can then easily create a collection of each photo shoot or at least go back easily and view the keepers from that shoot. But I also use ratings to keep track of the very best photos… some of the time. So here came today’s blog thought: Rate them now or you’ll have to catch up later.

This is true in so many areas of photo workflow. Keywords are a prime example. Do you enter keywords right after a shoot or do you delay this important step until some time later? What about metadata? Do you automatically have it entered on import or do you have to remember to do it later?

My ideal workflow looks something like this:

  1. Import all photos (metadata and some keywords are added automatically on import)
  2. Flag the keepers
  3. Add any additional specific keywords as needed (jersey #s for ball players, names, etc.)
  4. Color code any I plan on using for my blog, sharing on Google+, or any other use
  5. Edit any of the flagged photos as necessary
  6. Rate the best photos with 5 stars and the next of best with 4 stars
  7. Create a collection of this particular shoot for easy reference later
  8. Create a gallery of the keepers to share on my website

This is my ideal photo workflow that works well for me when I remember to do everything in this process.

What is your workflow? What works well for you? What do you struggle with?


Do You Print Any of Your Own Photographs?

Printing photographs has come a long way in just a short time. Years ago no one individual thought much about printing his or her own photographs. The lab technicians were the experts and so we dropped off or delivered film to them and waited for the prints to come back. Sometimes it seemed to take forever!

Enter the computer age and all this changed. Now individuals have the equipment to successfully print quality photos that rival and even exceed what the technicians did a few short years ago. The digital age is here and it offers some absolutely amazing possibilities for our photography!

I will admit, I was not too eager to jump onto the printing-your-own band wagon. Oh I did get a printer to give it a whirl, but the results were pathetic and downright awful. The colors were all off and the ink was blotchy. I could never give one of these prints to anyone nor would I ever want to hang one on a wall for anyone to see. So I let the photo lab do all my prints.

Recently, a good photo friend, Bill Weitzmann, was talking to me about how easy he found printing quality photographs to be for him. I listened carefully and tried to ignore the voice inside my head that was saying “been there done that unsuccessfully before.” Bill’s enthusiasm quickly touched and took hold of me. He made it sound easy and since we both use Macs, monitor calibration software is already built into our OS.

Leaving that exciting conversation, I decided to give printing another try. And boy am I ever glad I did!

I am not quite where I want things to be just yet, but the quality I am getting three days after my first attempt is nothing short of amazing. Bill provided detailed instructions for me to calibrate my laptop monitor and then have the printer read the color management from the laptop. The first print using his method got me so excited I could hardly contain myself!

My prints are still too dark but they are getting closer and closer to the quality I am after with printing on my own. I can see that at least some of my favorite prints will soon be hanging proudly on the walls of my home and our camp up in the mountains. The colors and the quality are mind-blowing to me. I never imagined this could be possible at this level.

I may share more details in-depth on a future blog post but for now I will just share a few things to keep in mind if you want to attempt this for yourself. And I highly recommend that you do! I was going to wait to get a more modern and better quality printer, but my Epson R320 is kicking out some fantastic results!

Printing Tips

1 – Calibrate your monitor
You want to be able to print what you see on your monitor and match that as closely as possible. Calibration is critical to get the best quality possible. This is even important to do when sending photos off to be printed at a lab, too. Otherwise you might be disappointed with what you get back.

2 – Use a color tablet
Kodak had an old book that included a color tablet, which is the spectrum of colors in the rainbow and various shades of gray. By matching this and tweaking the appearance in Photoshop you can get your printer to “talk” to your monitor and repeat the colors, so that what  you see on your monitor is what you’ll get when you print from your printer.

3 – Update Printer Drivers
I found out the hard way that this is a very important step. I suggest you actually do this first because it can save you precious time down the road later. My trouble was twofold: I upgraded the Operating System on my laptop and I was using an older style Epson printer, the R320. I was not even able to get the landscape printing feature to operate at all until I updated my printer drivers. I wish I had updated them right away before I got started as this would have saved many sheets of photo paper and much frustration!

4 – Consider Using Lightroom
Printing is definitely easy to do out of Photoshop or any other photo editor, but Lightroom allows for a broad variety of printing options. For example, in Lightroom I can print contact sheets, wallets, assorted layouts, backdrops, and much more; and it’s very easy! I love Lightroom to begin with as I use it to manage my photo database and edit all my select photos. I also use Lightroom to upload galleries of photos to my website. But now I know I am going to enjoy the Print Module, too. There are just so many neat options and features in Lightroom!

5 – Be Patient
This process of setting up your printer, calibrating your monitor, and getting it to all work together can be and probably will be frustrating at times. Only start this project when you have a decent amount of spare time. Be willing to make a few mistakes and keep trying to perfect the process. Patience will definitely pay off. I know this because I experienced it firsthand this week!

Create a Framed Matte Effect in Photoshop

I wanted to create a framed matte for my photographs that also incorporated a shadow effect with the photograph. It took a little time to figure it out and create it, but now with the use of a Photoshop Action, I can recreate this effect in a matter of mere seconds!

Here are the steps to create a framed matte effect yourself:

Step 1: Open a photograph in Photoshop (I already have it resized in Lightroom)

Step 2: Duplicate the layer

Step 3: Highlight the original layer and click on Image and then Canvas. Set the width to 1 and the height to 1, and the background to white. Click on Image and then Canvas again. Set the height to 1 and then click the up arrow in the anchor, and again set the background to white. Now, click Image and Canvas and set the width and height to .0625 and set the background to black.

Step 4: Double click the copied layer and setup the drop shadow. I set the angle to 120, distance to 10, and size to 10.

Step 5: Insert a text box with your name or title for the photograph. Set the font and size.

Step 6: Save the newly created framed photograph as a jpg for use in your blog.

It actually sounds more difficult than it actually was for me to set up. Once you’ve been through the process a time or two, do it again this time recording the steps as an action. Then you will be able to repeat this process with one simple click.