Before & After

PEPE#7-3496a

PEPE#7-3496b


Lightroom is my go-to choice for both keeping track of and editing my photographs. I do use Photo Mechanic and Aurora HDR software, as well, but those are topics for another blog post. I also have and use Photoshop, but easily 95%+ of my photo edits are accomplished in Lightroom. So I thought for today’s blog post, I would share this before and after photograph to just share a few edits I do routinely in Lightroom.

First, I have to thank Dick McCreight, my colleague and professional photographer who is an absolute guru with Lightroom’s Develop module. He makes it look so easy and is somehow uniquely able to teach what he knows. He is awesome! Thanks, Dick! Also, John Kliest, another colleague and photographer, recently helped me to better understand Lightroom’s Develop module. One tip in particular comes to mind that I learned from John, which involves the Highlights slider. I know my way around Lightroom’s Library module well. I can edit a new shoot in no time, flagging the best photos and using color labels to identify photos I want to use for my blog or some other purpose. The Develop module, however, was a place I somewhat feared to tread. It just seemed kinda overwhelming to me to be honest. Well, Dick and John relieved my fears and taught me some really valuable and helpful stuff so I can now edit my photos efficiently. Thanks guys!

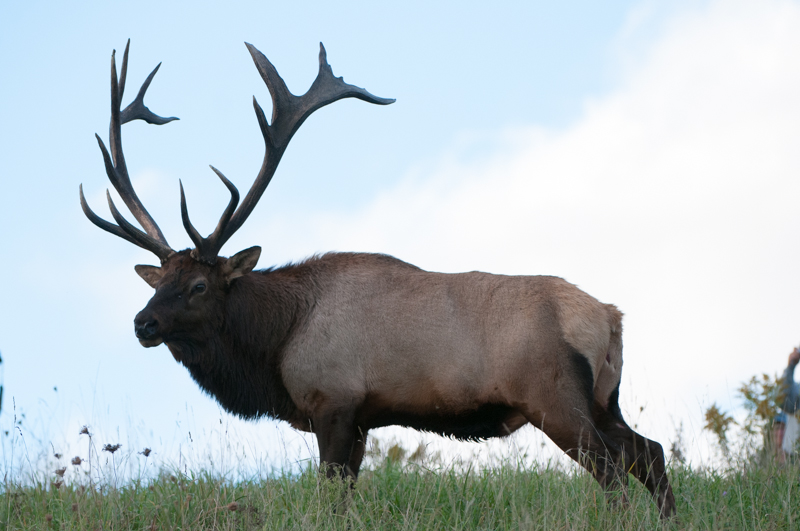
Let’s start by looking at the first photo above. You can see the exposure is a little dark and there is a floating arm from a person located in the lower-right corner of the photo. The cropping tool was used first and I just slightly cropped out that floating arm. LIghtroom makes this quick and easy.

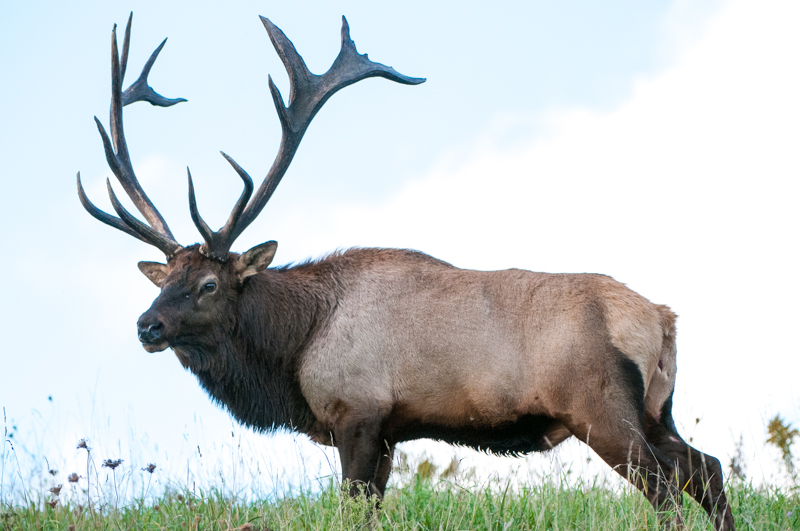
Then I adjusted the exposure, bringing up the light a little shy of half a stop. This was a good start to editing the photo but I knew I couldn’t stop here.

So, I then adjusted the highlights, white clipping, and black clipping sliders. The goal in wildlife photography is to always keep the focus on the subject. Working with the white and black portions of the photograph can sometimes provide drastic changes. Sure enough, once I made these adjustments, I had to scale back the exposure about 2-tenths of a stop. I guess I should have started with these adjustments before correcting the exposure.

Then I worked on adjusting the shadows and contrast. Typically, I find the shadows slider to be a very helpful tool in bringing details out of the dark, literally!

Finally, I added a little smidgen of clarity and vibrance, which I do to most of my photographs.

Within just a few short minutes I edited the photo to a very usable and better quality photograph by using the Develop module in Lightroom. I know I still have a lot to learn about properly editing photographs, but equipped with even the little knowledge I do posses, I can see big changes in my photographs after editing them.

Lightroom is a great tool on a number of levels. I will post more blog entries in the future to share in detail how I use this amazing software. Lightroom rocks!

Adding Multiple Keywords in Adobe Lightroom


Do you ever have the need to add multiple keywords to the same photos? I do. For example, after a high school baseball game I want to enter the players jersey number and their full name to their photographs. I find it better to do it now because at the end of the season I make collages for the seniors. All I  have to do then is search for the player name and jersey number and I am good to go!

Through some trial and error, I found a great way to enter these specific keywords to all the photos after a game. This might not make much sense to those of you who don’t use Lightroom, but I am guessing that similar procedures can be used with most software applications.

Here is how I enter multiple keywords after a photo shoot.

Step #1
I apply universal keywords when importing the photos for the first time into Lightroom. “Team name”, “Opponent”, “Away” or “Home”, and “Baseball” are all keywords that get entered into photograph as it is being imported.

Step #2
I create a collection of the keepers from the game. This prevents me from having to enter keywords into photos that I will never use. Time is precious, so saving time is essential!

Step #3
I created a filter that checks each photo for the keywords I am about to enter. This filter is pretty big because it looks for each jersey number and player name on the entire team. I initially created this filter to check to see if any photos from a game were left keywordless. But now I found another great feature by using this filter. I apply the filter just before I add keywords, so when I add keywords to a photo it “disappears” from the screen because it no longer matches that filter. So, as I add keywords, only those without the appropriate keywords are left on my screen. This is pretty slick in my opinion and helps me tremendously!

Step #4
I use the Painter Tool in the Grid view to add my keywords. I click on the Painter Tool and then enter the player’s jersey number, then a comma, and then the player’s name. Then I go through the grid of photos and paint on the photo that matches these keywords. As I do, they “disappear” because they no longer match the filter I selected.

Step #5
I skip over photos with multiple players in them because more than one jersey number and player name will be applied to these photos. I use the Painter Tool again if there are a good number of photos with the same two players in them, or I simply add the appropriate keywords to the remaining photos one-by-one.

When I’m all done, there are not photos left on the screen because they’ve been filtered out and I know that each photograph has been keyworded to my specifications.

It works wonderfully for me!

Sunlit Cow Elk

On a recent photo excursion to Elk County, Pennsylvania to photograph the elk, I captured an interesting photo of a cow. The setting sun was behind this cow so a silhouette was in my thinking. However, the warm sun rays provided enough light to illuminate the visible breath coming out of this elk’s mouth. It was a chilly evening and the condensation of this cow’s breath was visible in the light.

When I returned home, I knew I wanted to use this photograph if at all possible. But the problems were many-fold. There was some nasty sun glare from the sunlight hitting the lens. I thought maybe I could do a little touch-up in Photoshop and was hoping to be able to salvage this photograph in some usable form. I am not sure I succeeded quite yet. However, I thought I would share both a before photo and an after photo to let you see what I’ve accomplished so far. I still have a ways to go.

Do you think this photograph is usable or am I wasting my time?

Before: 


After: