Why I Use Photo Mechanic (Part 1)

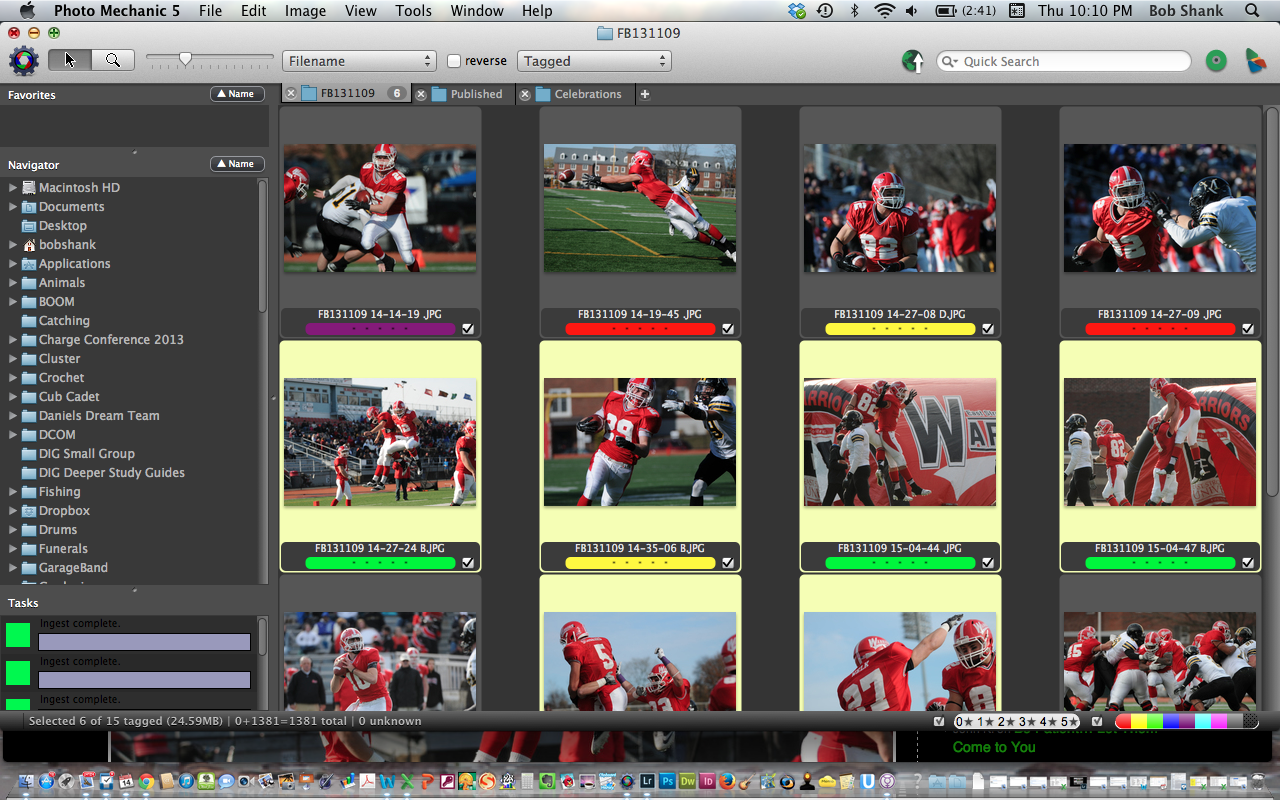
Screen Shot 2013-11-14 at 10.10.06 PMI was introduced to Lightroom several years ago and I still use Lightroom today. It is my preference for databasing my photographs and doing much of my photo editing and uploading galleries to my website. But something changed recently that introduced new software to my workflow.

I started shooting sports for a local daily newspaper, The Pocono Record. This new endeavor forced me to look at things differently in order to meet the stringent deadlines. One quick example: Friday night high school football games start at 7pm in my area and the deadline for photos to the newspaper is 9:15pm. The game is barely into the 3rd quarter in most cases by this time! Sorting through my photos and picking the ones to submit to the paper requires speed and efficiency.

I heard about Photo Mechanic and some of its speedy features, so I decided to check it out. I perused their website and decided to download a trial copy of the software for a month. After just one photo assignment, I was hooked!

The first reason I use Photo Mechanic is speed. This software doesn’t mess around. It allows me to quickly and efficiently sort through over a thousand images in short order. The speed of uploading my flash cards is much quicker than in Lightroom, and forwarding through image after image to preview them is much quicker, too! In reality, I read about this, but was hesitant to actually believe the hype. It wasn’t until I tried it myself that I realized the hype was right!

I will share my Photo Mechanic workflow in upcoming blog posts, but Part 1 of this series is clear: I use Photo Mechanic because of its speed. It is fast and it is efficient. Give it a try. Compare it to your preferred software and see if it makes any difference to you.


Finding Lost Files

I’ve never had the experience of having my kids getting lost and separated from me. I am sure that is an alarming feeling to say the least. But just this week I did experience that pit in my stomach when I wanted to find one of my favorite photos. It was lost! I searched and searched but could not find that lost file.

Part of my problem is that I have two computers, two external hard drives, and a Drobo. I can easily find all of my recent photos, especially those shot since I purchased my Drobo. Previous photos are harder for me to locate sometimes and this week was a prime example. Which drive could the file be on? Which date was the photo taken?

I typically had named my photo files with a date in this format: “2010-09-09.” Then eventually I added the event or location to the end of the file. For example: “2010-09-09 Elk County.” This naming scheme still caused some problems for me because what if I knew a photo was taken in Elk County but couldn’t remember which date it was taken? This was my exact problem this week. I knew the photo was taken in Elk County, but I could not remember exactly when I took the photo or even which year it was taken. Most recently I changed my naming scheme to the event or location first and then the date like this: “Elk County 2010-09-09.” This naming convention must be used by more and more photographers because Lightroom uses this convention in their latest version 3.0. This protocol makes sense to me because now all my events and locations are grouped together by name and then by date instead of vice versa. Obviously I did not make this name change to all my old photos or I would have found the file I was looking for this week.

I eventually did locate the photo I lost, but it was aggravating. How do you name your photographs? CanĀ  you find exactly what you’re looking for within a few short minutes? I was told a long time ago to pick a naming scheme and stick with it. I guess I haven’t found the best scheme for me yet. I am still adapting and changing out of necessity. Some day I will be able to not even think about this and it will just be second nature. In the meantime, I will continue searching for the best naming protocol that works best for me.

By the way, here is the photo that was missing in action until today.

The Ups and Downs of Learning

Did you or do you like school? I must confess that I was not the best student in any of my classes. In fact, I sometimes wonder how I graduated from high school! But with each step I took to higher education, I learned more and got better as a student. The progression, however, was not linear. There were many bumps in the road and plenty of ups and downs!

I find this to be true as I keep learning about photography as well. Some things come easy for me at times, but then there are those times when I pull my hair out trying to learn a new technique or skill.

Just tonight, I spent several hours trying to learn some new software–well, new to me at least. Thankfully, I had a friend beside me to show me the way, but it was not always easy and I am sure that I have a whole lot more to learn about this software. I do like learning and the computer has afforded me plenty of opportunities to learn more and more. I still remember the very first time I tore apart my pc and installed a new hard drive all by myself. Seeing the hardware underneath the hood and actually taking some of it apart was a thrill to me! Of course, I had to find a way to put it all back together, but the sense of accomplishment with this simple task was contagious.

If find a similar fascination with computer software. Can I find more efficient shortcuts or processes to make a task easier? Can I learn how to use this software for what it was intended but also learn how to utilize it in more creative ways?

Last night I worked on a project in Photoshop that was thrilling for me. It wasn’t anything fancy by any means, but to be able to work with a client and incorporate his vision for the desired outcome was enjoyable to me. Of course, I had to know how to use the software, but it was fun to actually be able to implement his vision into a tangible outcome. I attached a photo of this project for you to see here. Again, it is nothing very fancy but it reinforces my theory that learning has its up and downs. Tonight had some bumps in the road to learning new software for me, but last night I was able to get it right. So it goes with learning!

Wildlife Web Galleries

I already mentioned previously that I like Lightroom. I’ve been using this software for well over a year now and I love it! Just last night I watched a tutorial on how to use the upload feature in the Web Gallery Module. It got me to thinking that I can not only save time by automatically uploading photos to my website directly from Lightroom, but I can also keep galleries of my wildlife photos and just keep updating them automatically from Lightroom.

It took me a little while to implement my idea, but after a few trials and errors it worked! I was excited last night about this possibility and thought, gee, this is almost too easy! I suppose this is what software really should provide for us, but I typically find the opposite to be true. Computers and software are supposed to work for us and make our work easier, right?

Well, last night I implemented an idea that really shows that Lightroom can work for me in some very positive ways. For example, I wanted to create a gallery for each different mammal that I photograph–deer, bear, squirrels, elk, etc. Previously I created a gallery in Dreamweaver for this but then had to edit each gallery every time I added some additional photographs to the gallery. So last night I got the brainstorm to create the galleries in Lightroom and have Lightroom upload the gallery for each mammal. Now, when I add more photos I just upload the gallery again, which overwrites the old one and automatically adds the new ones. Now that’s efficient!

So now my website is starting to feature some of these wildlife galleries. You can go to my website and see these galleries listed on the right-hand side. Click on any of the mammals listed there to see the corresponding galleries. Thanks, Lightroom, for making this task not only manageable but easy, too!

Rounded Corners with Lightroom

This tip came from Matt Kloskowski on his Killer Lightroom Tips blog.

I’ve mentioned previously that Lightroom is powerful. It really is. And this tip is just one more example behind some of the unexpected power in this interesting software package. One of the main selling points of Lightroom to me was that it manages my photos, allows me to edit them, and provides ways to export the photos for use on web galleries, in email messages, or as physical prints. This all-in-one software even has me reaching for Photoshop less and less. The latest upgrade to 3.0 includes some really nice features and I am still learning some of the many features found in Lightroom.

The rounded corners tip makes for some interesting prints or photos to display on the web. You can learn the steps to make your own rounded corners by checking out Matt Kloskowski’s blog.

Here is my example of Matt’s tip. Pretty cool, huh? And all done in Lightroom.

I Like Lightroom 3.0

Two years ago, my good friend Dick McCreight, convinced me to download the trial version of Lightroom 2.0. I was hesitant because I had just starting using another software to manage my photos and I was not eager to shell out more money for another program. But after installing and trying the trail version of Lightroom I was absolutely sold. It also didn’t hurt that Dick is a guru with this software! Just watching him move around the computer screen and edit his photos was breathtaking for me. I still remember that day sitting in his office and watching in total disbelief at what this powerful software can do.

Now, two years later, I upgraded to version 3.0 and I couldn’t be happier. This software still rocks and has improved in some amazing ways over the previous version. The photo you see below was completely edited in Lightroom 3.0. I love the photo management that this software provides and I am slowly learning more and more about all the powerful editing features as well. Did I say Lightroom rocks? Well, it does!

Secure Web Galleries

I do a lot of sports photography but most of it is with young players whose parents may not be thrilled with faces of their children all over the internet. So, by using Lightroom to create a web gallery and then working in Dreamweaver, I can create password protected galleries that attempt to keep the photos more secure. For me it has worked beautifully and the parents of the players I work with seem to appreciate this extra effort.

Here is what I do.

I create a web gallery in Lightroom, which I described in yesterday’s blog entry. Then I open up the newly created index file of this gallery in Dreamweaver. I edit the file by adding some code that directs the web page viewer to a login screen. You can see an example of this login screen by going here. This additional code is not complicated and once I created it the first time I can just copy and paste the code into a new gallery without having to retype it.

The logon code is contained in a different file in the same folder or directory. This requires the webpage viewer to enter a username and password that I assign for the gallery. This information is passed on to the players, coaches, and parents. They are encouraged to share this info with their friends and family, but it prevents anyone who stumbles across my site from gaining access to the photos of minors. It works well and is not difficult to set up.

I then create a link on my website that allows the team to view the photos after they enter the username and password.

If you are interested in the details and code of how this is done feel free to email me. I am more than happy to share with others what works for me. After all, I learn something new every day about photography. It is a great time to be a photographer!

My Photography Workflow

After writing yesterday’s blog entry, it occurred to me that it might be worthwhile to explain my photography workflow in more detail. We all have our patterns, habits, and preferences. There is no right or wrong way to take our photos from our cameras to the end product, but some methods are easier than others. I do not believe my process is the only way or even the best way; it is just what I currently use after many years of experimentation and some trail and error.

I prefer using Adobe Lightroom for my photo management and editing software. Here is the workflow that I am currently using on every photo shoot.

First, I use a card reader to copy the photos into my laptop when on photo trips or my desktop when I am home. I copy the photos into the DNG format on import. Yes, this takes time, but the file sizes of DNG are smaller and you either have to convert now or do it later. On import I also rename each photo according to this format: date-sequence. So, for example, if I have a photo shoot today, I will create the import format to be 20100821-1, with the last number moving up sequentially for each photo. I will also add any general keywords that apply to all these photos. I have a Drobo so I import the photos directly to that physical drive and place all the photos in a folder named “Photographs.” I will assign a new folder name for the import by using the name of the photo shoot followed by the date. I like using the name of the photo shoot first, which is a change for me. I used to use just the date of the shoot, but that was not descriptive to me, so now I assign a name for each photo shoot to the folder name first. I also set up and use a saved metadata preset to assign copyright information, etc.

Once the photos are sitting in Lightroom, I then go through the photos to find the keepers. My process works like this. I enlarge the photo in the Library Module so I am only seeing one photo at a time. I use the right arrow to move to the next photo. When I come across a photo that I want to mark as a keeper, I press the “P” key to “pick” that photo. I have Lightroom set up to then advance automatically if I do press the “P” key. This feature of advancing to the next photo automatically when the photo is picked helps to move the process forward quickly. To set up the auto advance feature, click on “Photo” on the top menu and click on “Auto Advance.” I can quickly go through my whole shoot just picking the photos I want to mark as my keepers.

Once I go through all my photos I then create a collection just of these keepers. I may want to create a web gallery or slideshow of these photos, so I make the collection now. Then I go through the photos in this newly created collection. I am now looking for what I call the “Best of the Best” photos. These are the ones that make the final cut and ones I will show to clients, colleagues, or friends. These select photos need to be representative of my very best work so I am brutally hard with this part of the process. I will go through each photo again, carefully examining the composition, colors, exposure, lines, and other details. When I come to a photo that makes this final cut I then assign it a star rating. Usually these select photos get either 4 or 5 stars depending how on the strength of the photograph.

Now I will use these “Best of the Best” to post on my blog, use as initial proofs with a client, post to my website, or share in any number of ways. I often post all the photos in the collection if I have done a sports event because everyone likes to see their player in action. But if I am sharing photos in other ways I try to stick with just showing the “Best of the Best” photos from each shoot. Creating the web galleries, even with PayPal features, or creating slideshows are all very easy from within the newly created collection.

Sometimes I use color labels for specific reasons. I use a red label if I know a photo needs editing. The red label reminds me that I still have work to do on this photograph. I also sometimes use green labels to mark photos that I want to use for a photo book. And I use blue labels for photos that I want to use in a web gallery. I recently found a great feature in Lightroom that helps me use these color labels but without seeing the whole frame around the photo in that color. Having a photo surrounded in color can make that photo look different than when it is against a neutral background. So here is what I learned to do. Go to Grid View Options and deselect the “Tint grid cells with label colors” in the Options panel. Now go to the bottom of this same screen and select “Include Color Label.” This results in a small color swatch appearing beside the start ratings at the bottom of each photo in the Grid View instead of having that color surrounding the whole photo. Pretty cool, huh?

If this specific photo shoot was away from home, I will then import the Lightroom Catalog to my desktop computer so I retain all the picks, edits, and other changes I made in the field.

So this is the workflow I am currently using. What do you think? Does it make sense? Is there anything I am missing? How can this process be enhance and improved? What do you do in your workflow process? Please share your thoughts because we always learn more together than we ever learn alone!
The Value of a Spreadsheet

Do you know how much a spreadsheet can help your photography?

Most people assume that spreadsheets are only for working with numbers, but nothing could be farther from the truth. I use spreadsheets for all sorts of things. For example, I have one spreadsheet with my photo equipment dream list. One one sheet I prioritize the items I hope to buy in the future. On another sheet I track my savings for the next piece of gear. I can even compare features of several lenses side-by-side.

I use spreadsheets for upcoming photo events, too. I can list shots I don’t want to miss, create to do lists to make sure I am ready for the event, and even track my progress by using little check marks and highlighting what still needs to be accomplished.

Spreadsheets can be a great tool for the photography. Give it a try!

Taking Care of Business

I have a lot of photo editing to do tonight, so this will be a brief blog entry. Editing photos can be a time consuming process but today’s software makes it a breeze. Adobe Lightroom is my all-time favorite photo software right now. It not only excels at managing my collection of photos, but I can also change the White Balance, adjust the exposure, and even touch up part of a photo with the adjustment brush. It is some sweet software!

I still have to use Photoshop every now and then. It is very powerful and useful. The resulting images are so much more clear than back in the old film days. Just compare a scanned slide image next to one taken with a digital camera. It is amazing!

Ok, I really have to get back to my photo editing job. Good night!